
In this Digital era rolling out a bug free Software is utmost important and having regular regression cycles makes the software testers aware of the running software with any recent code pushes and other uploads. However, doing a manual cycle of testing each time could be tedious when it is regression of critical flows hence Automation is the key to scale your testing and run continuous regression cycles across the Software Development and deployment process. It is important to upscale and move towards a Shift Left approach of testing.
Shift Left is a practice intended to find and prevent defects early in the software delivery process. The idea is to improve quality by moving tasks to the left as early in the lifecycle as possible. Shift Left testing means testing earlier in the software development process. So, let’s get started on creating our first test automation script.
Step 1: Tools and Installations
In this blog, we assume you already have Python 3.x installed in your system with pip/pip3. Further, we will be using Pycharm as our IDE in this example for writing our Automation code. You can download Pycharm from here: Click here
Once you have successfully installed Pycharm, you may create a new project in it and add a python virtual environment as we would be installing some python packages for Robot Framework and Selenium. Now open up your Pycharm > Go to File > Settings > Plugins. You should see the following pop-up window opening.
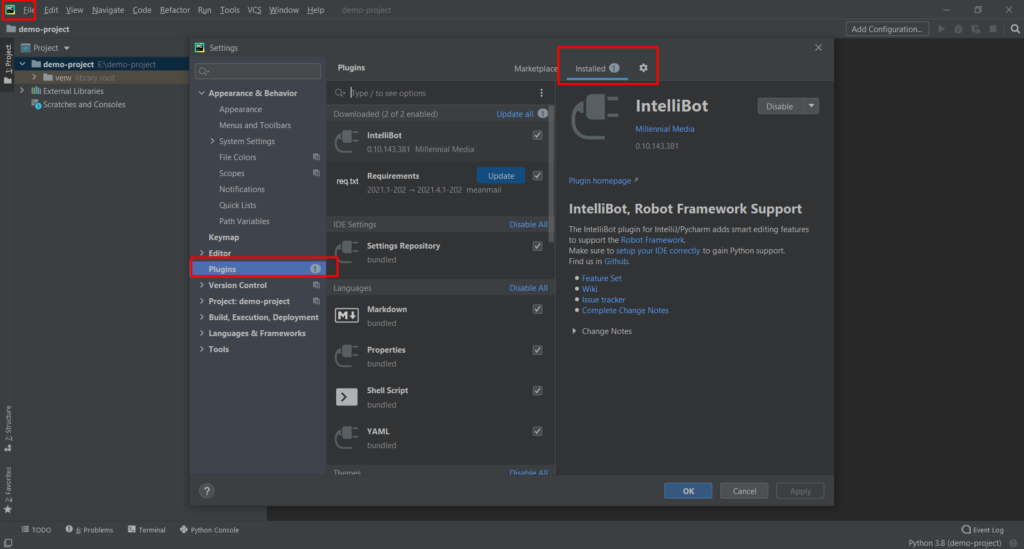
From the Installed Plugins tab, check if IntelliBot is already installed. If not, then click on Marketplace and install IntelliBot plugin.
After this is installed, close the window and click on the Terminal option at the bottom of the screen which will open a terminal wherein we can install our python packages using pip/pip3. Lets install a few packages now-
pip3 install robotframework
pip3 install selenium
pip3 install robotframework-selenium2library
pip3 install robotframework-seleniumlibrary
Now all our installation is completed, we can start writing our Automation code
Step 2: Checking web browser version and downloading the respective driver
In order to execute our tests automatically, we need to install a driver for our browsers. In this blog we will be using Google Chrome as our browser hence we will have to download the chrome driver for our browser to run the automation tests. Please note that just like chrome versions change there are chromedrivers available for each of these versions. Hence you need to check the Google Chrome Browser version and then download its respected chromedriver version.
To check the chrome version you can follow the picture as given below-
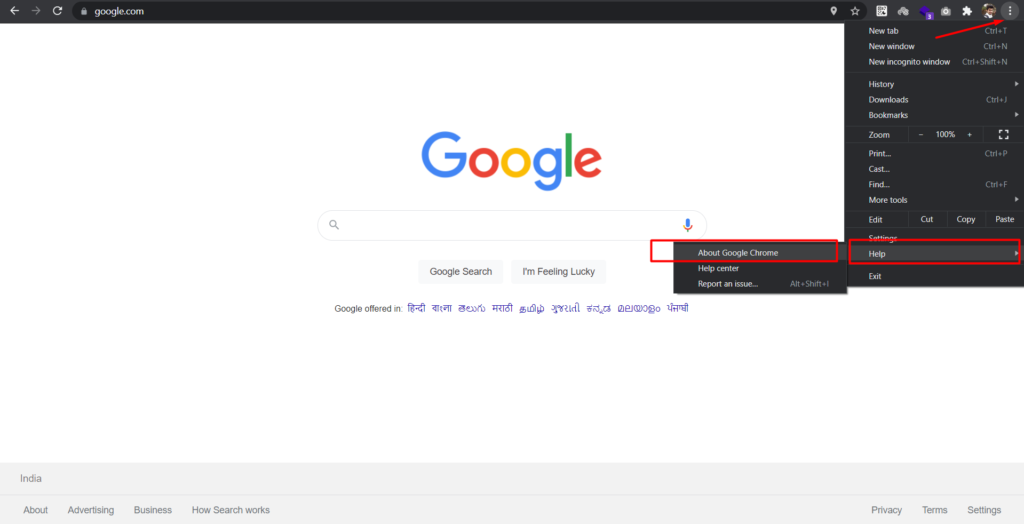
After clicking on About Google Chrome, it will show you the browser version that you have as below
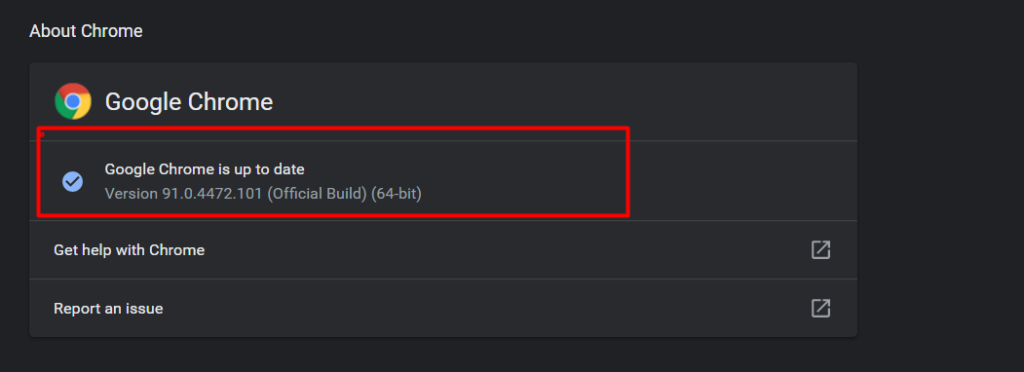
Now, lets download the chromedriver version in sync with our browser version i.e version 91.x. You can download the respective versions chromedriver and as per your OS from here: https://chromedriver.chromium.org/downloads
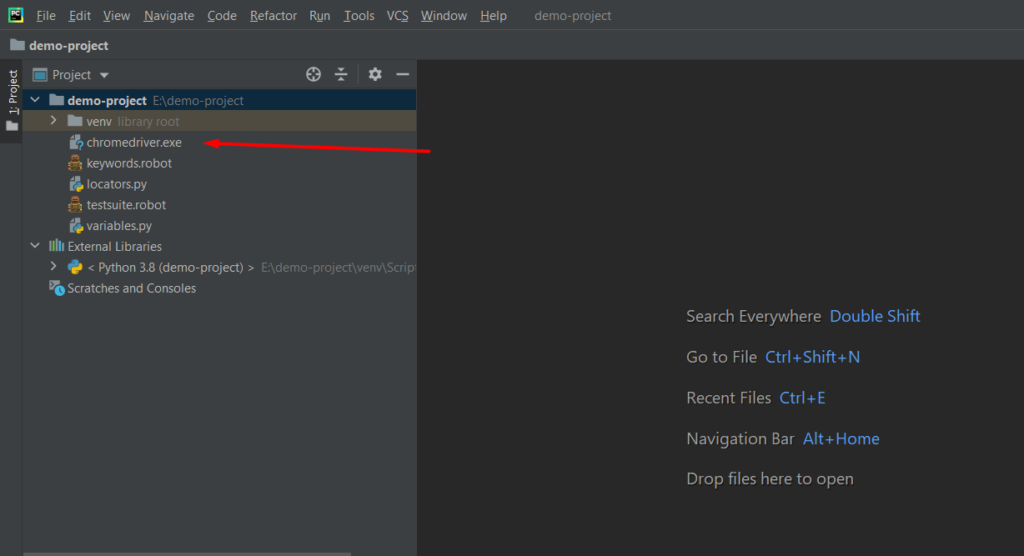
Once you have download the chromedriver, unzip it and keep the .exe file in the same directory as your project in pycharm, you may refer to the following image for reference
Step 3: Creating the structure of our framework
Robot Framework is a generic test automation framework for acceptance testing and acceptance test-driven development. It is a keyword-driven testing framework that uses tabular test data syntax. Now in order to keep our code structured and organized we divide the Robot Framework elements into 4 different parts which are as follows-
- keywords – We will create a file called keywords.robot which will hold all our keywords that we will use in our test suite file to run the test.
- locators – We will create a locators.py file which will hold all the DOM element locators into variables which can be used in the keywords file to locate the elements on our webpage using the DOM.
- variables – We shall have a variables.py file to store some variables like the base URL or some validation texts that we can use for Assertions, etc. This file will act as a normal variable file which will serve either our keywords file or the test site file.
- testsuite– Lastly, we will create our main test suite file as testsuite.robot which will consists of all our test cases that we wish to add here and execute them as our automation test suite.
Step 4: Writing our Automation Code in Robot Framework
Now as a part of our demo project let us write a very basic test that will open a browser, visit google.com and in the search bar enter Digital Vault Nashik. At the end we will verify the site title and end the test when it is successfully passed.
Let’s begin by adding the Keywords in our keywords.robot file-
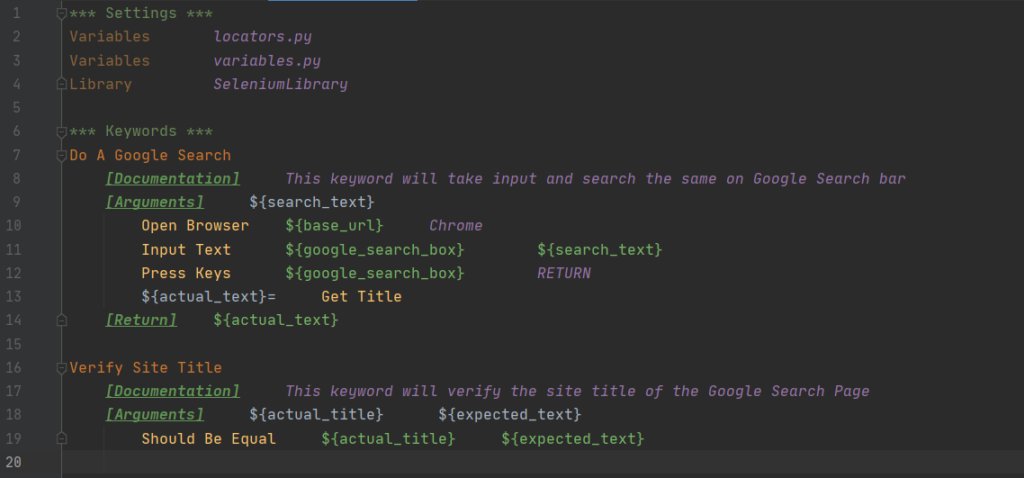
In .robot files, each keyword is separated by either one <TAB> or with <double spaces>, for the above keywords file we have imported the Variables and Locators from the respective files following with importing the SeleniumLibrary that we had installed in Step 2. Under the Keywords section, the two orange statements are our custom Keywords which we will be using in our Test Suite file to execute the tests whereas the keywords highlighted in yellow are the pre-defined keywords in the Selenium Library. The green mentions are variables which use ${<variable_name>} which are either being called from the Arguments of Custom Keywords or the external files which are imported.
Let’s have a look at the locators.py file-
google_search_box = '//input[@name="q"]'The above variable is used in the keyword file to do some action on this particular element locator. The element locators are the unique identifiers in the DOM which identity the element on the webpage and performs the actions or command as given in the selenium script or our keyword file in this case.
Similarly, we add the basic textual or any assertion related variables in our variables.py file. Let’s have a look at it below-
base_url = 'https://google.com'
text_to_search = 'Digital Vault'
expected_site_title = 'Digital Vault - Google Search'
As you can see these are the same variables that we have used in our Keyword file to execute the test or perform certain actions on these locators or use them for assertions, etc.
Now finally, lets have a look at our testsuite.robot file which will consists of all our tests-
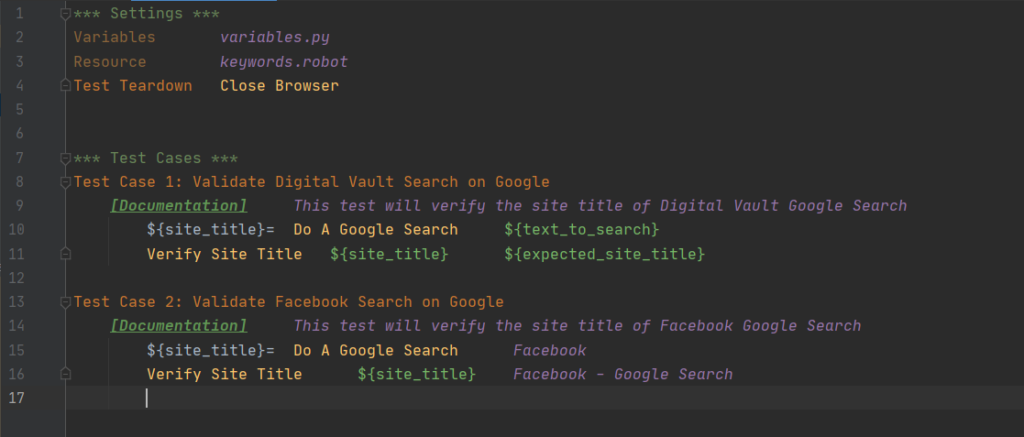
In the above example, we have added 2 test cases which are using the same keyword from the keywords.robot file as imported on top to perform the actions however the data is passed to them in 2 ways. In Test Case 1 we are passing the data from our variables.py file however in case of Test Case 2 we are passing the data by hard-coding the values. So if you look at it closely, we can add n number of test cases with similar behavior by re-using the same keywords and execute them either parallelly sequentially.
Now to run the above 2 tests, you just need to execute the following command in Pycharms terminal-
robot testsuite.robotThe above command will execute the tests sequentially and show the status as PASS in your terminal. The best part about Robot Framework is that it creates a report for you by its built in functions so that you don’t have to install anything in addition to view the reports of your tests. Below is the basic report format of our tests.
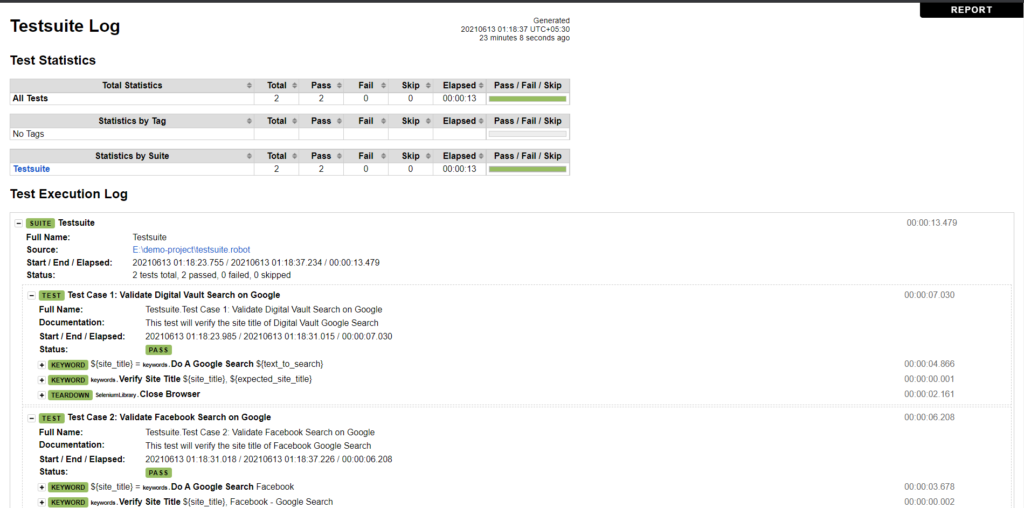
The above reports will show the time as well the details of each of the keyword that was executed during the test. It considers both the pre-defined keywords as well as the custom keyword generated by us. Finally this is how you can create your own automated test suites and keep running them to ensure a high quality Software Application.
Sample video-
References for Exploring:
- Selenium Library: https://robotframework.org/SeleniumLibrary/SeleniumLibrary.html
- String Library: https://robotframework.org/robotframework/latest/libraries/String.html
- Selenium2 Library: https://robotframework.org/Selenium2Library/Selenium2Library.html
- Robot Framework: https://robotframework.org/
- Pabot in Robot Framework: https://pabot.org/